Sunday 4 March 2012

Mother's Time

As mentioned in this post here I have been a bit stuck for time and once again am on the last minute keeping up with challenges and comments.

I did manage to create this card though for the Shabby Tea Room's 'Shabby Shutters' challenge which provided us with a shabby but sophisticated photo (above) with a Parisienne theme with the requirement to use navy blue, neutrals and a distressed element.

I was fortunate enough to come across some actual resin shabby shutters by the fabulous Prima Marketing in the local craft store.

I made a blue rose & glittered it up. I also finally(!) managed to find some satin seam-binding which I dyed and scrunched. I have only come across one store in the whole of our city which sells satin seam-binding! And I stamped a tag with a Paris/postage stamp.

I added a nice frilly doilie and topped with the shabby shutters. I made a teensy weensy blue rose and added a glittered heart-shape with the word 'Mother' attached as it will soon be Mother's Day.


Since it is not Mothering Sunday til 18th March ...I am now ahead of time!

Time

Never enough of it!

This last week I have been working on a tag and present for my brother whose birthday it was on Friday.

I made him a movie with Windows Movie Maker (took me aaages as I was trying to work out how to use the programme as well as actually making the movie). It was a series of photographs from throughout his life - images of the newspaper birth announcement, baby photos, right up to the present ...all set to music ...Groove Armada's 'Hands of Time'.

I put the movie on a usb stick along with some music. I wrapped the usb stick in some kraft paper and attached it to the tag. The paper was held closed around the stick just by the jute twine so all he had to do was unfasten the string and the stick was inside.

I stamped the tag with a pocket watch and the words 'birthday time'.

Here are photos (not very good photos as I was rushing to get it into the mail) of the front and back of the tag.

Front...

Back... with a space under the Happy Birthday stamp to write a little message
.

He liked it very much!

Sunday 26 February 2012

At Home

I used to work at a printing firm a long, long time ago, in the office. We used to get orders for printing 'At Home' cards. I thought it was a delightful idea.

Here is some history which explains the origins & tradition of being 'At Home'.

The Shabby Tea Room's challenge & inspiration photo 'High Tea' reminded me of this idea.


The provided photo is delicious in itself with the teacup & saucer decorated in crisp turquoise with gold edging & flourishes and a sweet pink rose. We are to use the colours in the photo and doilies.

Here is my card. I have made it an invitation to be sent to someone inviting them to drop round for a cup of tea and some cake! A sort of At Home card.

I made the backing paper myself using stamps with turquoise and gold ink. The stamped flowers look a bit random. They were meant to line up alternately ..but the light was fading so I had to hurry a bit.

I also made the palest pink flower myself from some colour(ink)-washed paper scrunched up & punched. I punched a frilly heart and covered it in nearly half a bottle of turquoise glitter!

The 'invitation' stamp is quite sweet & it was being sold off cheap, it was only a couple of ££s. I stamped twice and cut the invitation sentiment off one stamped image and used foam tape to position it over the first stamp to add a bit of dimension and finished it off with two Melissa Frances blue sticky pearls.

The flourish stamped in gold just above the doilies is from Hobbycraft who have started doing their own range of small stamps. It was perfect for this project.

Despite having two largeish craft stores a few miles away I struggle to find the best things to use, including doilies. I did however find these little ones.. though they are made of thin paper & are a bit shiny on one side (so I turned them over to have the more matte side which I think is nicer facing front. I had to put three on together to make it thicker & so that you could actually see they are there!

Finished with a bit of pink ribbon.

(And a cup of tea).

Monday 20 February 2012

Dot dashing...

Took me ages to find this after seeing it on the telly. Although it seems a little scary at first it is very sweet & do watch to the end!


So cute!

Hope it makes you smile too :)

Sunday 19 February 2012

Cherry on top

The Shabby Tea Room's challenge this week has been all about the cherries in celebration of National Cherry Month (February).

This photo and their design team projects have provided us with some gorgeous inspiration to get our juices flowing....

I also learned a bit about cherries including that February 20th is National Cherry Pie Day in the US (check out this website for some beautiful pics of cherry pies - but warning, not when you are hungry), there are proverbs & quotes about them and that there is such a thing as Cherry Tea.

Suitably inspired, I made a tea bag envelope (similar to this design via here) and also a tea bag tag (round like a cherry!), using the colours from the photo and featuring cherries of course, for this challenge.

I tied off the end threads of the sewing at the front of the envelope to make a tiny bow with a little flower.

The cherry image is all thanks to The Graphics Fairy and I stamped the lettering ENJOY on the tag

So, take teabag out of envelope...

Pop it in a nice cup...

...and enjoy a nice cup of tea! (and a sneaky pastry)

I am amazed (though not really) at the number of people, and especially many crafters, who not only like tea but also love doing tea properly with china & teapots & beautiful table linen & flowers & tea parties. Here is a photo of my collection of cups I like to drink tea, usually Earl Grey, from.

And the cherry on top? I should say it was all the stuff I learned about cherries but in all honesty it was because I got to eat a cake with a cherry on top ...just to get in the spirit of things you understand.

Tuesday 14 February 2012

Two little words that DO go together

Two words that DO go together are these...


I have been amazed at the number of people who both love crafting, all things floral, coloured, designed, patterned etc ...and drinking tea.

Although tea is best drunk out of fine bone china I am sorely tempted by either or both of the two mugs in the pic. But which one 'love' or 'tea'?

The beauty of these mugs for me lay in the simplicity, the words -love and tea- and the way the words are impressed in the clay...

The way the words are impressed creates the impression that someone actually took the time to actually press the word into the clay. The impression suits me fine.

I was bought a (metal type) typewriter for xmas when I was ooo about 8yrs old.... I also once worked (in the office/admin) for a printing firm that used metal (alongside modern techniques) type ..so there is something about the way these words are impressed on these mugs which evokes the memory and love for the way in which metal type impresses and, by extention, rubber or acrylic stamps impress or work on the surface of card/paper in a way which computer & printer doesn't (though I equally love the latter for different reasons & uses).

It's Valentine's Day!

...Google loves ya!

You will notice that sometimes the regular Google logo is ..hmmm... a little bit different.

HERE is how and why.

Imagine my surprise, and indeed, flattery, when I found that actual Google sent me a Valentine's message....

Monday 13 February 2012

Two words which should never normally be seen together in a sentence

...I have fallen in love with punches!

So much so i just had to spell it out with the help of my actual punches as in the pic above ;)

You can use the shapes created in their own right.

You can use the holes they leave behind for stencilling and the shapes themselves as masks for inking over (though not as rough and messy as this).

Another love of mine are those lusciously dimensional chipshapes ....but what happens when you have used them and have none left and you don't have a fancy machine that can cut through thick card ...make your own of course using the originals as templates or stencils depending on which bit you are using.

Draw round them onto thin card multiple times, cut them out and glue them together. Being hand drawn and cut will inevitably lead to mismatches in exact shape but you can always stack them together see how they line up and snip away any mismatch either before or after gluing together (but remember to note how they go together) You can also sand round the edges once they are glued together and dried. This seems to have the effect of fusing together the layers (so long as you have glued up to the edges) and you can hardly tell they weren't one original piece of board. A bit labourious I know ...but intensely therapeutic and great for practising ones scissor (or craft knife) skills!

Here's some I made earlier!

(the light grey ones I didn't make - they're original shop bought chipshapes)
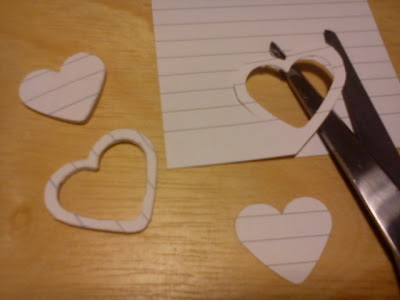
The heart shape was made with a punch which makes the process of making multiple shapes to be glued together soooo much easier. And the heart shape with the cut out middle was made by cutting around the outside of the hole left behind by the punch like so...

Then you can paint, glitter or add lovely paper for the top layer for use as embellishments.

..and this is where my project for this challenge began...

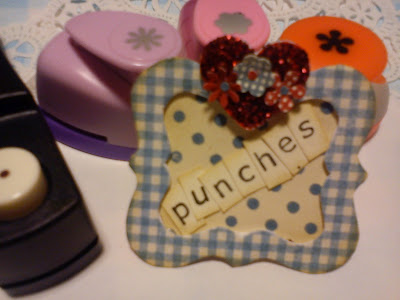
...as a token of my love for my punches I decided to make a label to go on the box I will keep them in...

I painted my punch/chipshape heart red and added glitter.

I used a chipshape to draw round (eg x4) to make the frame... )if you are very careful cutting out the middle you have another 4 readymade shapes which can be stuck together for another project)

I added some paper to the frame, stamped a background layer with some polka dots and stamped out the letters p-u-n-c-h-e-s.

I made some tiny flowers ...yes you guessed it! with punches. I even made the middles of the flowers with the tiniest single hole punch (to the left of the pic below).

Anyway I think by now you can see that I have a hot passion for these cool tools (sorry too many puns) and thanks to the Moxie Fab world challenge to use punches in an innovative way it inspired me to show some love for punches.

(ps come back tomorrow for a blogpost about two words which should definitely go together and a pic)

Sunday 12 February 2012

Sweets for my sweet....

Sweets (or candy) ...one of life's essential food groups!

..and no Valentines Day should be without it.

Here is my card for the Shabby Tea Room 'Candy Hearts' challenge


I've been experimenting a bit lately with making my own background papers ...largely because so many of the papers I buy are just too yummy to cut into... and with a high turnover of products in the shops once you've used your favourite gorgeous paper ...its gone :(

So I made a pink gingham pattern on some card for the background and used some Tim Holtz distress ink to make it a bit vintage ...and indeed a little bit retro to go with my 'Love Hearts' themed card... these Love Hearts (remember these?).
Wouldn't try eating these ones though...


The heart stamp set is from We R Memory Keepers and the all the lettering is made using a cute set of alphabet stamps - tiny little stamps mounted on wood... it was quite difficult getting them to line up though! I nearly used the &?.! it comes with! But they are the sweetest little sets and come in a few different fonts. There doesn't seem to be a link to the product on the suppliers site but here is what a google search finds.

I hope everyone gets some love & sweets, chocolate and/or food of one's hearts contentment this Valentine's Day. No sweet heart in your life? ...treat yourself!

When life gives you lemons....

..or rather lemon cakes (which myself and autistic son made)

..make a lemon cake box!


I made it using Judy Hayes' template from the July/August 2011 issue of Papercrafts magazine. The template can be downloaded here. Such a simple design but very effective and cute (when made with cute/gorgeous paper)
I simply printed off the template, drew round it onto my paper & cut it out with scissors!

I used some yellow card/paper that was just lying around the house, lined it with some nice crepe paper, punched a frilly heart, stamped it up and put a cake in it with the intention of saving it for my other son. Sadly, we had to eat it as he wasn't due to visit. ;)

Thanks, Judy for making the template available. I think I shall be using it alot!

I have also decided to share this project (though not the cakes, they're all gone ;p) for the Shabby Tea Room 'candy hearts' challenge ...we have hearts, punched & stamped ..and the food theme... well it was there til we ate them all!

Sunday 5 February 2012

A love letter to my heart

What could be more romantic than a bundle of old postcards tied up with string, a frilly heart and a rose. Well, that's my entry for the 'love is in the air' challenge from the Shabby Tea Room. I have used pink, red & a little white, although mainly 'white' aged with distress ink. And a little light brown/sand colour for some of the lettered stamping.

And since I won't be getting any Valentine's cards (ahhhh!) this card is to me!
The writing stamped on the heart is made using a stamp from Prima Marketing Inc. Romantically, it has both New York and Paris on it ..though I had to stamp quite carefully to get them in the right place. May be I will go there one day.


The background paper was also made with a Prima stamp and the Post Cards were made with watercolour paper, Tim Holtz distress inks and a post card stamp from 'Clear Choice' stamps.

The gorgeous rose image is from some wrapping paper I have but will mostly never use because it is too lovely! I stuck it to some layers of card, edged it with gold, put a thin layer of glue over the top to give it a sort of lacquered/enamel finish & sprinkled it with glitter.

I might buy myself some real roses & chocolates to go with my card

Love, me!

Sunday 22 January 2012

Peachy!

This weeks "Gorgeous Gateaux" challenge from The Shabby Tea Room girls was indeed a challenging challenge with the requirement to use the colour combo of peach, lilac, pink and grey. Also to be used are lace and metal.

Here is my effort.


Believe it or not the torn paper piece with the words stamped on are washed in a very pale lilac acrylic paint - camera hsn't picked it up properly. I stamped it with grey, peach and pink ink with the words 'love' and 'divine'.

I embossed the cake shape with a cuttlebug polka dot embossing folder (and an, ahem, rolling pin).

I so loved the large peach flower in the inspiration photo I decided to make one myself. Didn't turn out too bad. I made it by painting tracing paper (for the right texture) with a wash of pale peach acrylic paint then using a flower punch to make some flower shapes which I then snipped a bit to make the petals a bit more spiky.

There is pink lace and for my metal embellishment I made a hat pin with lilac, pink and pearl beads on it and I twirled the wire stem of the pink rose.


The orange (variation on peach!) polka dot paper is from Making Memories Chloe's Closet.

All in all not quite gorgeous but it does have a cake on it!

Sunday 15 January 2012

Vintage Beautiful Boudoir Bliss

I've been so busy making other things I almost didn't make this challenge in time...


How timely and how beautiful this Shabby Tea Room inspiration photo is.

I recently got some free clear stamps with a craft magazine. It had a tailor's dummy in it which I couldn't wait to use.

And since part of the challenge was to use a sewing related embellishment ...what better than a tailor's dummy. I printed it in bronze ink on some paper I had painted a sort of duck egg blue. Also included is a piece of lace and a button which I had which were the perfect colour. Of course, I also just had to use my Sew-Easy tool to make the holes for the sewing on the edge of the paper.


(the second photo was before it was assembled)

This photo shows more detail of stamp...


Unfortunately it doesn't feel like it will last long ...although it is a clear stamp it is very jelly-like and I am certain to break or damage it in some way ..if not from overuse. See I just had to use it inside the card as well!


The tag is a standard office supplies tag to which I added a punched butterfly stamped with a Kars butterfly stamp. Amazingly for those of us on a tight budget they do some small packs of stamps for a couple of pounds. I can't resist buying a new set each time I visit the craft shops.


The project was begging for one of those miniature white frame embellishments to be used as there are a couple of white ornate frames in the inspiration photo and also lots of ornate carving on the chest of drawers. Since I didn't have any of those frames and unlikely to get to the shops to buy one I decided to try to re-create similar using stuff I already had. So I used some finely corrugated card for the frame and for the ornate carving on the frame I used some plastic foliage which I once blagged from a homewares store. They were moving their display of artificial flowers and lots of bits had fallen on the floor and were being swept up ..so I asked if I could have some! I painted the whole thing with white acrylic paint and voila! you can almost hardly tell the difference.

The 'canvas' background for the frame was something from an earlier experiment gone wrong (watercolour paper scrunched and stained with tea - see here) - never throw anything away!

Joy - the name of the woman whose boudoir this is has done some altered art herself and cut out the original picture from the frame and placed in a rose - something which she clearly loves.

I love these roses - they look good enough to eat. The packet just bears a company sticker with 'Sweet Lilac' printed on it.

The polka dot paper is Melissa Frances Fifth Avenue and the other paper which is like an image of some fabric is Laura Ashley paper. The pink rose and the polka dot paper adds a hint of contrast colour to an otherwise almost monochromatic scheme.

All in all a fantastic challenge with a beautiful photo for inspiration. The photo shows a boudoir as it should be - beautiful and blissful and shabby and vintage all at the same time.

Christmas catch up

Just a few cards and wrappings I made over christmas...
...an old rose I made from crepe paper...


A gift bag I decorated with some Fifth Avenue paper, pink netting and some pink tinsel bought at reduced price...


A Christmas card..


Some food labels for mother's Christmas Eve buffet...


My Christmas tree from the garden (the top off one planted a few years ago)..


Didn't make these.. cute little glittery birds perched in my tree...


My brother's birthday card..


Inside birthday card..


Birthday pressie..


A thank you card...


A New Year card...


Another thank you card..